Friday, March 16, 2012

Afternoon Activities!

I spent one day in the South End school this week, and I was SO inspired by these awesome afternoon activities that I just had to share!!  Each day, the teachers prep an activity for the children to do at the table after nap. The teachers  have the activity on the table READY for the children to explore upon wake up time.   It's so great to keep them engaged from the time they wake up from their siesta, until the time they go home.  I hope you feel as inspired as I did!!


SCIENCE/FINE MOTOR ACTIVITY

Preschool teacher, Claudia, had this AWESOME science/fine motor activity prepped for the kids!

In an ice cube tray, put water in just the OUTSIDE COLUMNS OF CUBES.
So in this picture, you see 7 columns of cubes.  She put clear water in columns 1, 2, 6 and 7. 

Add primary colors of food coloring to each cube with water. Red, Yellow and Blue.

Now your little scientists are going to get to work mixing the colors together in the empty cubes!


Have them use eye droppers from your science collection, or sanitized medicine droppers as well!
The children spent a very long time mixing the colors together and creating their own shades of the rainbow!

Then Maria Castro showed us that if you use the eye droppers with the colored water on printed words, it makes the words look MAGNIFIED!

It was like the words on the paper were growing!!  So cool!


SENSORY TABLE ACTIVITY

Substitute teacher, Maria, had this AWESOME science/sensory table activity prepared!


In the morning, the children were using dry spaghetti with Styrofoam blocks in the sensory table.

I know that many of our sensory tables are RED boxes. So in the afternoon, Maria wanted to change that, by lining it with silver aluminum foil!

She then added polar bears, shaving cream and the styrofoam "icebergs".

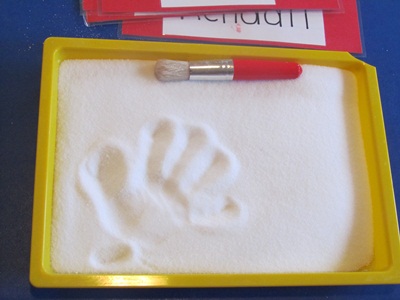
Oh my did the kids love it!!  She get their hands right into it and felt like they were in the Arctic!

They were also able to draw letters in the shaving cream too!  Just imagine all of the possibilities that you could do with the aluminum foil in YOUR sensory table!  It would certainly change the background if you added water and food coloring, or pasta, or just about anything!!

ART ACTIVITY

Pre-K teacher, Wendi, had this art activity prepped on her table!

Wendi put out tissue paper, mosaic squares and collage paper out on the table, along with paper plates and glue.


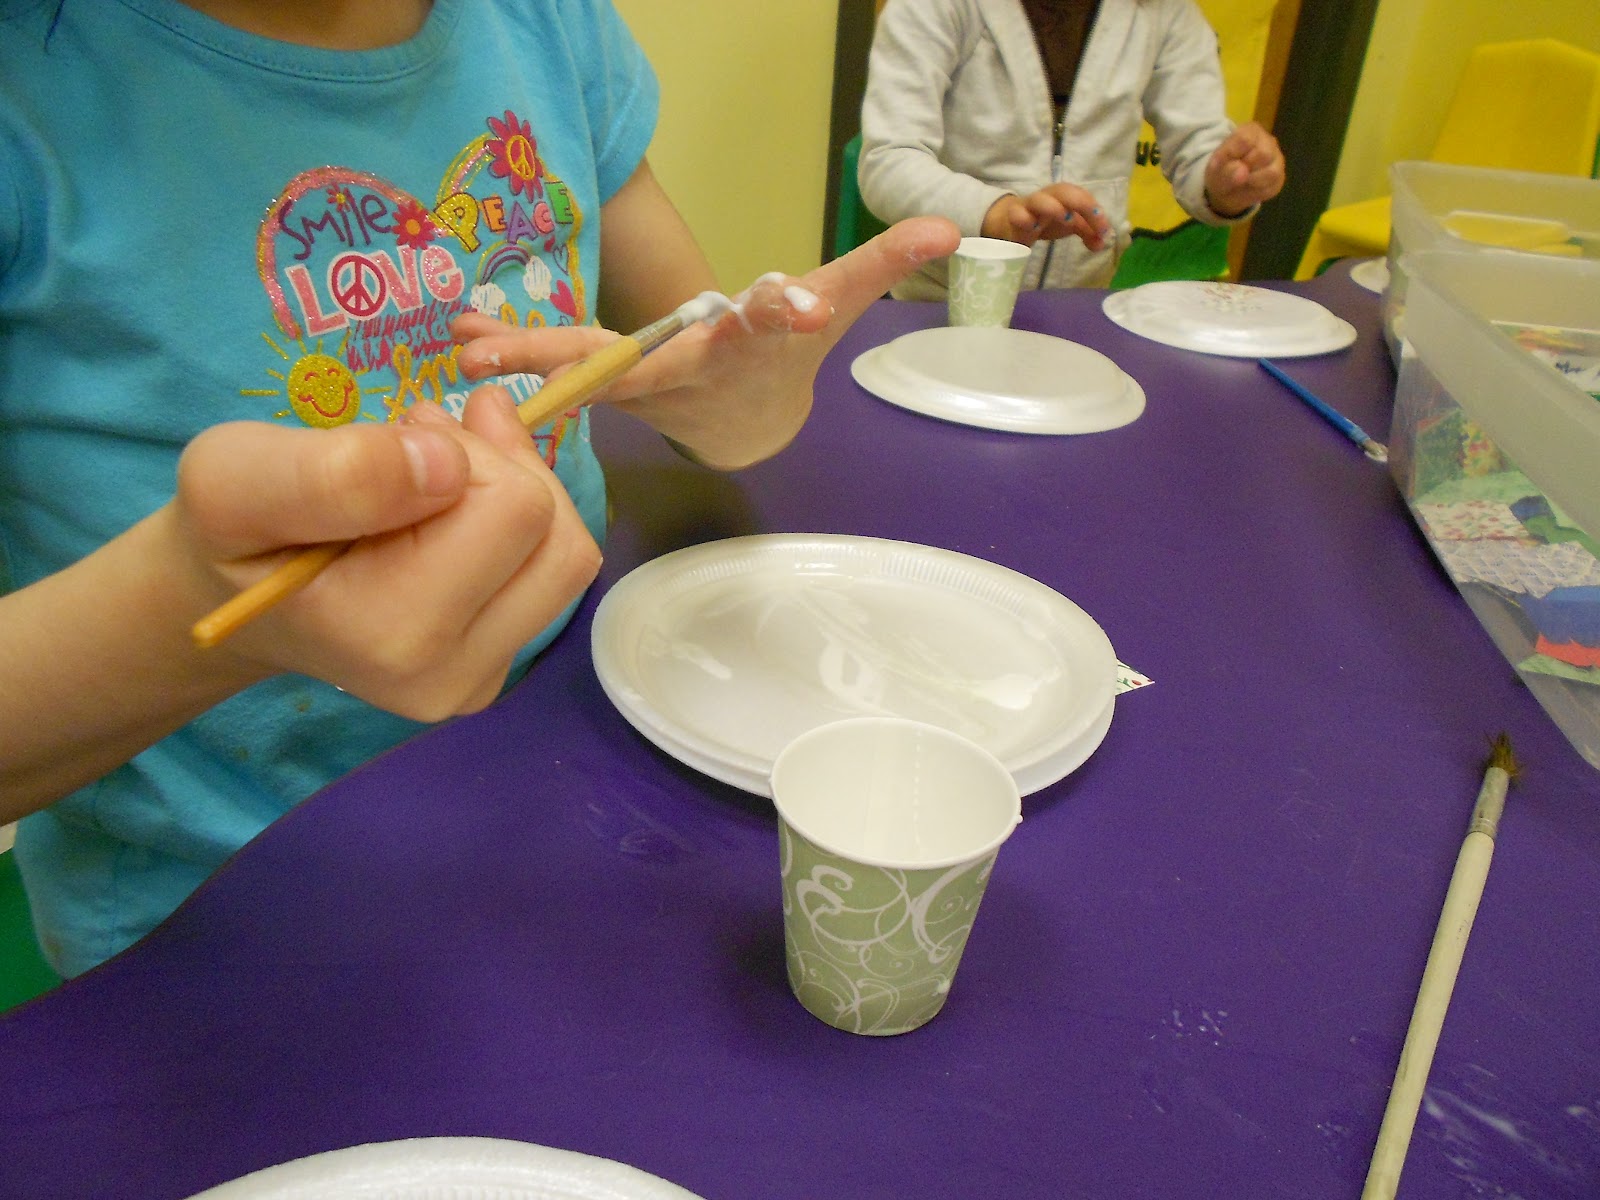
Some children wanted to paint their hands with glue! She just wanted to explore the sensation and texture on her hand.  

They made their creations into turtles!!


I just had to share this video clip of one of the children singing the "En mis Botas" song as she did her art!

Another ART ACTIVITY
Toddler teachers, Lali, Karina and Lidiani, had this GREAT art activity out for their toddlers using recycled pizza boxes!!

They put out the pizza boxes with paint and a variety of materials. 

I loved that there were cookie cutters, rollers, scissors and all sorts of things for them to explore.


The toddlers spent at LEAST half an hour on this and had so much fun!!

 IDEAS DE INSPIRACION IN ACTION

It was really cool to see some of the Do It Yourself Ideas that I have been sending out this year IN ACTION in the schools!!!  Here are just a FEW of the samples I saw from this week!

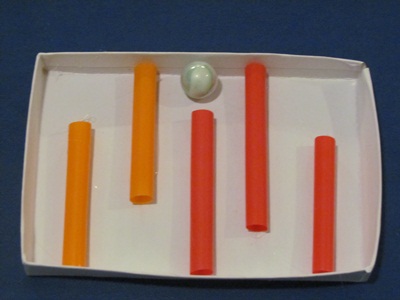
Myrna in the SOUTH END made the magnetic popsicle sticks so that they could create various shapes on the table!  

All she did was hot glue the magnets to the ends of the sticks with OPPOSITE magnetic poles so they would repel or attract to one another.  The kids had a BLAST making different shapes and experimenting with the concepts of repel and attract.  Super math and science activity!

Lidiani in the SOUTH END spent part of her prep time making a large STICKY BOARD for the kids to explore.   She put out pipe cleaners on the board as inspiration for them to create whatever they wanted!
Savi in NEEDHAM used the black sticky paper and straws with her kids to do a math/counting activity!

Savi in NEEDHAM,  created a SHOE STORE DRAMATIC AREA to talk about patterns and pairs!

Savi in NEEDHAM also added a beach section to her dramatic area!

Marissa and Maria in NEEDHAM created a whole rainforest in the DRAMATIC AREA.

Fiorella and Teresa used blue Painters Tape to make their own "Sticky Board" for counting!

They just set up the tape on the table by turning the ends down, and sticky side up.

The kids were able to do all sorts of patterns...

And they even put the tape on a box top!  So  cool!!


The ideas are endless and I hope you are just as inspired as I was!  I look forward to visiting more schools next week!!

Jacie


Friday, March 9, 2012

DO IT YOURSELF IDEAS!!

As early education teachers, we are always looking for new materials and resources to add to our classrooms.  In a few easy steps, there are SO MANY THINGS that you can MAKE YOURSELF to add to the classroom.  I have spoken with several directors who are itching to make the LIGHT TABLES that I sent out several weeks ago.  I can't wait to see how they come out!  I will be sure to post pics!  Plus, I have heard of at least 3 schools that have made the STICKY BOARDS and have put out their own cool materials for the children to explore.  AWESOME!!  It sometimes just takes a little hot glue, and a little bit of time to create some cool stuff for your kids to play with and explore.  Check out these Math, Fine Motor, Science, Literacy and Dramatic Play ideas that will hopefully inspire you to try something new!!

MAGNETIC CRAFT STICKS- MATH

Here's something you can create for all of those MAGNETIC WALLS and DRY ERASE BOARDS and CHALKBOARDS that I have seen in your classrooms!  (*If you don't have a hot glue gun and refill glue, it can be found easily at your local DOLLAR TREE store.)

Gather together some colored craft sticks and a collection of circle magnets.  Discount School Supplies carries the sticks, or Walmart, The Dollar Tree, Target...Michaels or AC Moore surely have the magnets!


Take out your hot glue gun, and start gluing the magnets to the ends of the sticks.  


Assemble some of the sticks into simples shapes like triangles and squares and hot glue the magnets to the ends.

Place the sticks in a basket in front of your magnetic board and let the children explore lots of math concepts with this easy Do It Yourself activity!  It's great for Toddlers all the way up to Pre-K!!

MARBLE MAZES - FINE MOTOR

Here is a homemade game that can add a little extra fun to your preschool or Pre-K classroom.  
(*Marbles are not safe for children under 3 as they are a major chozing hazard.)
Collect some small gift boxes (*check out the DOLLLAR TREE) and cut up some straws.

Get out your hot glue gun and set up the straws in different patterns.  It may take some finagling to make sure that the size of the marble fits properly between the "lines."

Try to make different mazes for the kids to explore!

It takes concentration and good eye-hand coordination to get the marbles through the mazes!  They will surely have an aMAZE-ing time!  


MAGNETIC MARBLE TUBES - SCIENCE
Here's another cool Do It Yourself project that is good for those Pre-K and Preschool classrooms.  It's a great way for the children to practice their Science and Engineering skills!

Take a variety of toilet paper tubes, paper towel tubes and even gift wrap tubes cut into various lengths.  Paint them if you want to!  (*If you paint them, I advise covering them up with clear packing tape so the paint doesn't chip off.)


Gather some more MAGNETS and glue them to the edges of the tubes.

Place the tubes in a box or a tray in front of your magnetic board along with some small balls or marbles.

Your little engineers will start constructing, and collaborating together to make a variety of Marble Runs!  It will take some team work and trial and error, but they will get it so the marbles run all the way down the tracks!


SALT TRAYS - LITERACY
Here's a VERY EASY Do it Yourself project that consists of buying some very inexpensive containers of salt at your local grocery store.  

Once you buy the salt, pour it into a tray, or a gift box.  Use whatever you have handy. You may have to play around with the amount of salt depending on the size of your tray.  It will probably be one container of salt to each tray.  Get some chubby brushes and nametags of the kids!  

You will need to show the kids how to use the brushes to write in the salt since they may be used to scooping and pouring it like a sensory table activity.  Show them that they can use the SIDES of the brush to flatten out the imprints, and the ends of the brush to write.

They may end up hiding their nametags in the salt, but they will surely have fun writing upper case and lower case letters in the trays!!  You may even want to try coloring the salt together as an activity beforehand as a variation!  

DO IT YOURSELF DRAMATIC AREAS
The dramatic area is one of those centers that is SOOOOOOO important to change out on a monthly basis.  With pretend play, it is really important to continue to give the children new experiences and setups for them to role play by adding some easy  home made props to stimulate their imaginations. So if you are studying dinosaurs, make a dinosaur land/cave for the kids to act out what they are learning about.  If you are doing a Circus unit, make it into a Ticket Booth.  Other ideas are making a Post Office, a Hair Salon/Barber shop, a Movie Theater, a Weather Studio, a Restaurant, an Animal Shelter, a Camping Area, An Ice Cream Store, A Shoe Store, An Iceberg, The Beach, A Flower Shop, A Castle, A Gas Station, A Car Wash, A Bank, A Pizza Parlor, A Jewelry Store, A Science Lab...The IDEAS ARE ENDLESS!! It can sometimes be easy to leave it as a Kitchen/Housekeeping area for the entire year, but by doing so, it really is a disservice to the children and it is not stimulating the interests of the children.  Since we are educators and we have the autonomy to be able to follow the leads of the children with an emergent curriculum, listen to what they are playing together and then just go for it!!  

Here are just a SMALL SAMPLE of some of the dramatic play areas that you can do from Alicia's classroom in Brighton.  Using large BOXES is probably the simplest way to make a different dramatic play area. The kids can even help with the homemade materials depending on what your theme is!  Get creative and have fun!!


A FIRESTATION


EL SUPERMERCADO

LA CASA


LA CUEVA


Remember, if you have anything you'd like to share on the BLOG with the Pine Village staff, please contact me so I can come out and take pictures!  Or just let me know about the cool things you're up to when I am visiting your school!  Gracias!

Jacie


Friday, March 2, 2012

Literacy in the Classroom

Literacy in the Classroom

Yesterday, I had the opportunity to attend a Community Partnerships for Children meeting, where one of the presenters was a kindergarten teacher from the Newton public schools.  She shared with us what it means to the "READY" for kindergarten and what the expectations are.

She emphasized that the most important criteria for a successful start in kindergarten are: ROUTINES for children, self-help skills, social-emotional skills, being able to follow directions and also their organizational skills (i.e. can they open their own lunchbox, remove their own food, and put it back again.)  As early childhood educators, we focus on all of those things, and it's a nice reminder that these important skills are what's going to help the children to have a successful experience in their future schooling. These skills start in our Toddler groups and move all the way up to Pre-K.  It's not JUST the Pre-K year that is getting them "ready" for kindergarten.

She also emphasized that an EXPOSURE to letters and numbers are what sets the children in kindergarten up for success.  Let me repeat myself: an EXPOSURE.  So that doesn't mean that every child should be reading and writing by the time they leave pre-kindergarten, and it also doesn't mean that they shouldn't have any awareness of phonics and letters.  As you know, some children do leave our programs reading and writing, while others just have an understanding of letters and sound recognition.

There are SO MANY ways to introduce literacy to the children in your classroom in a fun and meaningful way.  As you know, we do not introduce letters to the children as the "Letter of the Week".  Removing letters from their meaningful context removes the meaning and purpose from the letter.  Here are some ideas for inspiration!!  


SIGNING IN:
Have the children "sign in" to school each morning as they arrive to school.  If you put a dry-erase board on the door, then they also need to practice writing on a vertical surface.
When Savannah did this in the Needham school last year in her mixed age preschool classroom, the children started with their first names, and then progressed to writing their last names.  Some children started out by only wrote a few letters in their names, and then others started working on writing lower case letters and in a smaller space. The toddlers started seeing the older kids "sign in" each day, and they wanted to practice too!  So they would sometimes just put a "mark" on the board as their way of signing in!!  


OR....
Another way to do it, is to put out a notebook, and have the children sign in on the paper each morning upon arrival as Alicia does in the Brighton school in her preschool classroom.  If you keep the date on it, then you can easily cut these out as samples for your PORTFOLIOS to see the progress of each child.

Circle Time Idea!
Reading aloud to the children EVERY DAY is one of the best ways to share an appreciation for the written word.  Here are a few other ways to introduce literacy to children of all ages!
Claudia in Needham has a catchy song that she sings with her pre-k class each day during circle time.  It's sung to the tune of "Twinkle, Twinkle" and it requires a response from the children so they HAVE to practice their ESPANOL, while also READING their friends last names. This can be adapted to different ages and even with the child's first name.


1.)  She shows the nametag to the class and asks who it belongs to.
2.)  She begins the song, "Noah Siegal esta aqui?"
2.)  The child either responds , "Si, Si, ESTOY  aqui."  or they all sing as a group, "No, no, no esta aqui."  

MORNING MESSAGE:  
Write down a DAILY  message to the children and read it all together.   Have one of the "jobs" be to help you point to letters that are in the Morning Message.  

Print Rich Environment:
By LABELING toys with pictures and the WORDS in both English and Spanish it helps to not only keep your classroom space organized, but also is another way for children to experience literacy on a daily basis.
Here Alicia in Brighton organizes her markers in her writing center BY COLOR and is labeled in ESPANOL.
Alicia's crayons are organized by color as well and have the words in both Spanish and English.

Everything has a label and a spot for it to go.
Even the blocks are separated by shape and LABELED in Spanish!

Here is a shelf in the pre-k class in Jamaica Plain (Elba and Janette's room) with photo labels with the words on it too.

Writing and storytelling:
Children of all ages "write" in their own way, and by offering a lot of different medium to explore these writing skills, it gives them lots of opportunities to enhance their love of letters!
Here are some children writing on a dry erase board on top of two chairs in our Needham school!  They are collaborating together as well as exploring the idea of writing, erasing and starting all over again!


Another great way to model writing is by taking STORY DICTATIONS.  These are one of the monthly requirements for the PORTFOLIOS that is an easy thing to do!  After the children create their art, ask them to describe what they did.  While they tell their story, write it down and add it to your display of their art.  The children see you modelling writing and valuing what they have to say about their art.  It's a great way to monitor their language development as well!  Older children in Pre-K can  use INVENTED SPELLING  to write their own stories!  They have to sound it out and write as they hear the sounds.  
Here's a sample of a picture and a story in Spanish that one of the children wrote in the Pre-K class in Denise and Alejandra's room in Kendall Square!!  Check out the creative way that it is hung up!


SONG BOX:
All of you have seen my "Bolsa de Canciones", that has an image of the song as well as the title.  The teachers in Kendall Square have an adaptation of the song bag, and have their own Song Box made out of a  Baby Wipes container which they use with their TODDLER class!  


The kids pick the songs out of the box and "read" what it is by looking at the picture.  
The song box is a Baby Wipes container that is covered in all sorts of decorations!  
They all sing the song together and they all take turned picking!  So fun and it's a great way to introduce the idea that pictures and words are meaningful!

DRAMATIC AREA

The dramatic area is a great place to introduce literacy to the children.  Here's Maru's POST OFFICE that she created for the kids.  They can write letters, send them and pretend to be a community helper! 

LETTER HUNTS:
This is just one way to play a letter game with the kids in your class!

Savi in Needham is doing a letter hunt for the word "CALABAZA".  

The children used magnifying glasses to search for the hidden letters in the room.  

They had to match the letters that they found to the letters on the white board.  They talked about the sounds that each letter made and even counted all 8 letters.  

CLOTHESLINE NAMES:
Here's one other cool way to use clothespins and literacy!  
Materials:
  • 2 dowels from craft store
  • 2 empty yogurt containers or similar with lids
  • Yarn or string
  • Mini-clothespins
  • Envelopes
  • Sentence strips or index cards
  • Plaster of Paris
  • Scissors
  • Permanent marker
  • Hot glue
  • Colored markers, colored index cards, or colored sentence strips (optional)
Directions:
Start by writing each child’s name on a sentence strip or index card with a permanent marker. Make sure to leave enough space between each letter so you can easily cut the names apart. Next, cut the names apart between each letter and place them inside an envelope. Write each child’s name on the front of an envelope and add a digital picture of the child to the envelope if extra support is needed.
Now, make a small X cut in the top of each container lid big enough to slide the dowel through. Fill the containers with Plaster of Paris and put the lids on. Push the dowels through the hole in the lids and let dry. Attach your string or yarn to the top of the two dowels and secure with hot glue.
The children then need to spell out their name on the clothelsine!

This could easily be used with Sight Words, last names, and other thematic words too!


READING LOG:
Encourage the PARENTS to read at least x number of minutes a night to their children.  After they read the story, have them color in a happy face if they liked the story, a "so so" face if it was just OK, or a sad face if they didn't like the book.  It's a nice way to involve the parents in exposing the kids to more literacy activities.

THE IDEAS ARE ENDLESS and these are just a SAMPLE of things you can do!  MORE IDEAS TO COME!!!